Rooftop Orchard Space Requirements: An Engineering-First Guide
Contents
You have a vision of ripe figs and crisp apples growing above the city noise. But the first time you carried a 20-pound bag of soil up three flights of stairs, you started asking harder questions. How much weight can this roof actually hold? What happens when it rains and everything gets heavier? And is a 10-gallon pot enough for a real tree, or are you just growing an expensive stick?
Most guides skip the math and jump straight to pretty photos of potted citrus. This one does the opposite. You will learn how to calculate your roof’s real weight limit, what to ask a structural engineer before they visit, and how to choose between container, modular, and intensive systems based on your building’s actual constraints. By the end, you’ll know exactly what your roof can support and what it can’t.

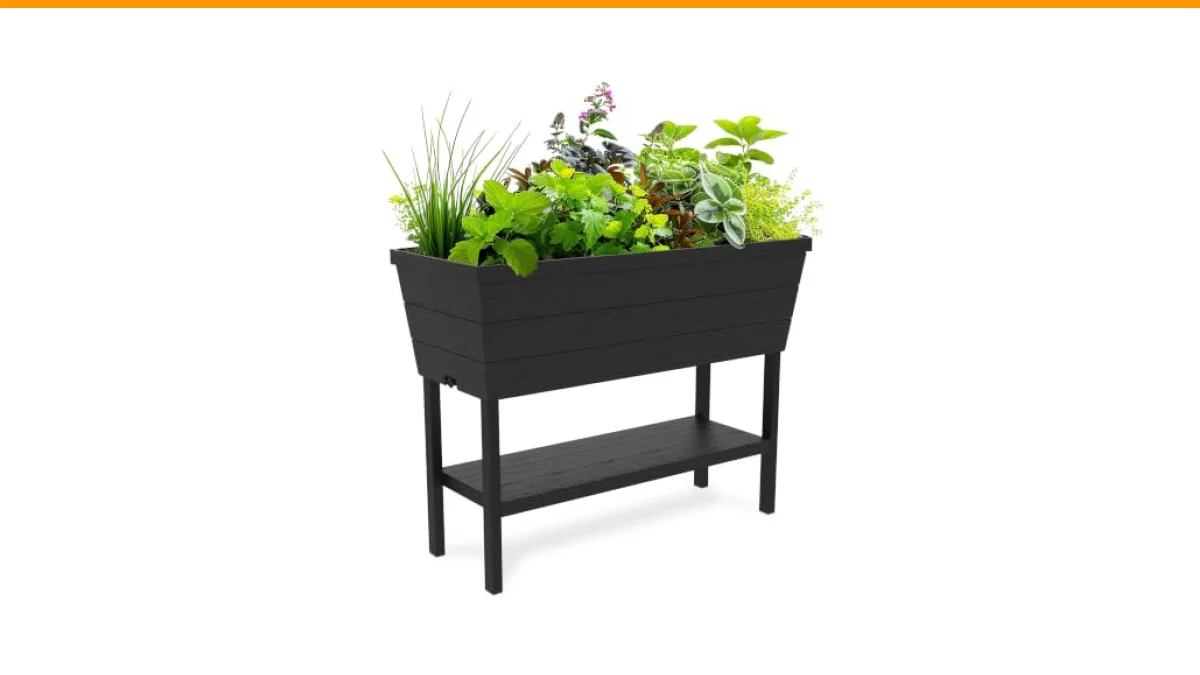
Keter
Keter Urban Bloomer 12.7 Gallon Raised Garden Bed and Outdoor Herb Garden Planter with Self Watering Gauge and Drainage Plug, Dark Grey
- DIMENSIONS: 32. 3 in. L x 14. 7 in. W x 30. 7 in. H
- The easiest outdoor herb garden planter with built in water gauge it indicates when plants need additional moisture
- DRAINAGE SYSTEM that can be opened or closed for full control of watering
For smaller projects or herb gardens that share the space, a self-watering planter like the Keter Urban Bloomer raised garden bed simplifies the watering routine. Its built-in water gauge removes the guesswork, which helps when you are balancing fruit trees and herbs in the same footprint.
The Math First: Calculating Your Roof’s Real Weight Limit
Before you buy a single tree, you need a number. Roofs are rated for a specific dead load (permanent weight) and live load (people, snow, rain). A typical residential roof might handle 40 pounds per square foot (psf) live load. A commercial building could be rated for 100 psf or more. You need the live load figure from the building’s structural documents.
Here is the simple formula for what you are actually adding:
Total Weight = (Soil Weight + Container Weight + Plant Weight + Water Weight) / Area of Footprint
Let’s run a real example. A 24-inch diameter pot covers about 3.14 square feet. You fill it with 15 gallons of wet soil. Wet soil weighs roughly 10 pounds per gallon, so that is 150 pounds. The pot itself is 10 pounds. A small dwarf fruit tree might weigh 25 pounds. The water reservoir adds another 15 pounds when full. Total is 200 pounds. Divide by 3.14 square feet, and you get about 64 psf. That’s too heavy for a roof rated at 40 psf live load.
Here is the part most people miss: soil weight fluctuates. Dry lightweight mix might weigh 6 pounds per gallon. Saturated soil after a two-day rain can hit 12 pounds per gallon. That is a 50 percent swing. If your roof is near its limit in August, it will be over it in November. Always calculate with saturated soil weights, not the dry bag weight from the store.
Also account for people. A single person standing near a tree adds 150 to 200 pounds concentrated in a tiny area. That is why engineers separate live load from dead load. You need your total (soil + pot + plant + water) to stay under the dead load rating, leaving the live load rating for people and weather.
The 3-Step Structural Check (Before You Buy a Single Pot)
You cannot skip this step. A collapsed roof is not a garden failure; it is a safety hazard. Here is a practical sequence to follow.
Step 1: Find the original structural drawings. Look for the building’s original blueprints or structural report. You need the load rating for the specific roof area you plan to use. These documents are usually with the building manager, the original architect, or the local building department.
Step 2: Ask the right questions before the engineer arrives. Do not just say, “Is my roof strong enough?” Instead, ask these specific questions:
- What is the dead load and live load rating for this roof area in pounds per square foot?
- Where are the load-bearing walls and columns located underneath?
- What is the condition of the waterproofing membrane?
- Is there a parapet height requirement for fall protection?
Step 3: Get a written assessment. A structural engineer will cost a few hundred dollars for a site visit and a letter. That is cheap insurance. They will look at the joists, beams, and the condition of the deck. If the building is older than 30 years, they will also check for rot or corrosion in the supporting structure.
One thing to keep in mind: the roof area directly above a load-bearing wall is much stronger than the center of a span. If you have a heavy 100-gallon container, place it near a wall or column, not floating in the middle of the roof. Distributing weight across multiple smaller containers is also better than one massive planter.
Waterproofing and Drainage: The Layers That Save Your Building
Most rooftop garden failures are not about weight. They are about water finding its way into the building structure. The waterproofing membrane is the only thing between your saturated soil and the living room ceiling below.
The biggest mistake is placing containers directly on the membrane. Over time, the weight of the pot compresses the membrane. Roots can penetrate small cracks. When you move a pot, the abrasive base can scrape the protective layer. You need a protective layer between the membrane and your garden.
Here is a proper layering system from bottom to top:
- Waterproofing membrane: This is the building’s existing protection. Verify it is in good condition before you start.
- Protection mat: A thick geotextile fabric or rubber mat that prevents the membrane from being punctured.
- Drainage layer: Plastic egg-crate panels or a 1-inch layer of coarse gravel that allows water to flow away from the soil.
- Filter fabric: A permeable sheet that keeps soil particles from washing into the drainage layer.
- Containers or growing medium: Your pots or raised beds sit on top of this system.
What actually goes wrong? The most common failure is a clogged drain. Leaves, soil, and roots wash into the roof drain and block it. Water pools on the membrane, finds a seam, and leaks. You need a leaf guard over the drain and a routine cleaning schedule every two weeks during the growing season.
Another failure mode is the “bathtub effect.” If you build a raised bed directly on the roof without a drainage gap underneath, the soil becomes a sponge holding water against the membrane. Over years, this causes the membrane to degrade and fail. Always allow air to circulate under your containers. Simple feet or pallets create that gap.
Wind and Sun: Designing for the Rooftop Microclimate
Rooftops are harsher than ground-level gardens. Wind speeds are higher, sun exposure is more intense, and temperatures swing more dramatically. You are designing for a microclimate that is closer to a desert mountain than a backyard.
Wind is the silent killer of rooftop trees. A 30-mph gust can snap a young tree in a lightweight pot. The leaves act like sails. The higher the parapet around you, the more turbulent the wind becomes as it spills over the edge. Trees near the parapet get hit with the worst gusts.
Wind protection strategies that work:
- Use heavy, wide-based containers that resist tipping.
- Stake young trees for the first two years until the root system anchors.
- Place taller trees on the leeward side of the roof (away from prevailing wind).
- Install a windbreak like a lattice screen or dense shrubbery on the windward edge.
- Group containers together so they shelter each other.
Sun exposure is the other variable. A south-facing roof with no shade gets 8 to 10 hours of direct sun. That is fantastic for figs, citrus, and stone fruits. But the heat also radiates off the roof surface, raising the temperature around the pots by 10 to 15 degrees compared to the air temperature. Roots in dark plastic pots can literally cook on a 90-degree day.
You can manage this with light-colored pots, a layer of mulch on top of the soil, and by shading the pots themselves. A simple wrap of burlap or a second outer pot creates an insulating air gap. Also, know your local frost patterns. Rooftops are often warmer at night because heat rises, but they are also more exposed to cold winds that can damage early blossoms.
System Selection: Containers vs. Modular vs. Intensive
You have three main ways to build a rooftop orchard. Each has different space requirements, weight profiles, and maintenance demands. Your choice comes down to roof load, budget, and how much time you want to spend caring for the trees.
Container systems are the most common. Individual pots range from 10 to 30 gallons for dwarf trees. They are movable, cheap to start, and easy to replace. The downside is that small soil volumes dry out fast and restrict root growth.
Modular systems use self-contained raised beds with built-in water reservoirs, like the Keter Urban Bloomer mentioned earlier. These are excellent for smaller trees and shrubs. The water reservoir reduces the frequency of irrigation, which is a real advantage on a hot roof where you might otherwise water every day. They also have a drainage plug so you can control the water level.
Intensive systems are essentially a green roof with deep soil. You build a permanent bed over the entire roof area, with 12 to 24 inches of soil. This is the most productive system for real fruit trees, but it is also the heaviest. A 24-inch deep bed of saturated soil weighs over 200 psf. Very few existing buildings can handle that without major structural reinforcement.
Here is a comparison to help you decide:
| System Type | Weight (psf) | Soil Depth | Best For | Setup Cost | Maintenance |
|---|---|---|---|---|---|
| Container (10-30 gal) | 30 – 80 | 12 – 18 inches | Dwarf trees, flexibility | Low | High watering needs |
| Modular Raised Bed | 50 – 120 | 12 – 20 inches | Small trees, herbs, water efficiency | Medium | Medium |
| Intensive Green Roof | 150 – 250 | 18 – 24+ inches | Full-size trees, high yield | High (needs engineer) | Low after establishment |
Here is a simple decision tree. If your roof load is under 50 psf, use containers only. If it is between 50 and 100 psf, modular beds are your best option. If your roof is rated above 150 psf and you have access for a crane or a strong elevator, an intensive system might be worth the engineering cost.
Remember that soil depth matters more than surface area. A 20-inch deep bed in a 4×4 foot area will support a much healthier tree than a 12-inch deep bed in a 4×8 foot area. Roots need room to grow down, not just out.
Container Depth and Soil Mix by Crop Type
Not all fruit trees have the same root requirements. Matching the container depth to the tree type is a common mistake. You cannot put a standard apple tree in a 12-inch deep planter and expect fruit.
Here is a practical guide based on root depth:
- Shallow roots (12-18 inches): Strawberries, blueberries, currants, figs (with heavy pruning).
- Medium roots (18-24 inches): Dwarf citrus (lemons, limes), peaches, nectarines on dwarf rootstock.
- Deep roots (24+ inches): Apples, pears, cherries on semi-dwarf rootstock. These need large containers or a deep bed.
The soil mix is just as important as the depth. Regular garden soil is too dense for containers. It compacts, holds too much water, and suffocates roots. You need a mix that balances water retention with aeration.
A reliable recipe is 60% high-quality potting mix, 20% compost, and 20% perlite or coarse sand. The perlite keeps the soil from compacting. The compost provides nutrients. You should also add a slow-release organic fertilizer at planting time and again in early spring.
One thing I have learned the hard way: do not use soil from the ground. It often contains pests, diseases, and weed seeds that will thrive in a protected rooftop environment. Start with a sterile, bagged mix.
Space Planning: Layouts for Small, Medium, and Large Roofs
The layout determines how many trees you can fit and how much sun each one gets. A cramped layout where trees shade each other will reduce yield across the board. Here are three layouts that work.
Small Roof (under 200 square feet): Focus on a single row of dwarf trees along the sunniest edge. Use espalier training against a wall to save space. You can fit 2 to 3 dwarf fruit trees in 20-gallon pots spaced 4 feet apart. Add a vertical layer with vertical growing techniques for herbs and strawberries underneath.
Medium Roof (200 to 500 square feet): Use modular raised beds arranged in parallel rows. Space the rows 3 feet apart to allow access. You can fit 4 to 6 trees in a mix of 15 and 25-gallon containers. Place the tallest trees on the north side so they do not shade the shorter ones.
Large Roof (over 500 square feet): Consider a combination of intensive beds and containers. Create a “grove” feel by grouping trees in clusters rather than rows. Use the interior space for a seating area. You have room for 10 or more trees if you plan carefully.
No matter the size, always plan for a clear path to the roof drain and the access point. You need to be able to move heavy items and perform maintenance. A 3-foot-wide path is the minimum for comfortable movement.
Irrigation and Drainage: The Boring Stuff That Keeps Plants Alive
Watering a rooftop orchard by hand with a hose is a full-time job in summer. A 20-gallon pot of soil in full sun can lose 2 to 3 gallons of water per day. That is 20 gallons a week per tree. Hand watering that volume is exhausting and inconsistent.
Drip irrigation is the standard solution. A simple system with a timer, a main line, and individual emitters for each pot costs less than a hundred dollars and saves you hours every week. Use pressure-compensating emitters so that each tree gets the same amount of water regardless of its position on the line.
Do not forget about drainage. Every container needs holes at the bottom and a way for excess water to escape. If water sits in the bottom of a pot, the roots will rot. For modular beds with a built-in reservoir, the drainage plug gives you control. You can keep the plug closed to store water in the reservoir, or open it to flush the soil of excess salts.
Here is a practical tip: check the soil moisture with your finger, not a schedule. Stick your index finger two inches into the soil. If it feels dry, water. If it feels moist, wait a day. Self-watering containers with a gauge, like the Keter planter, make this easier because the gauge shows you the water level at a glance.
Realistic Yield and Cost per Square Foot
You need to know what you are getting into before you invest in soil and pots. Rooftop yields are lower than in-ground orchards because of the confined root space. But with the right system, you can still get a meaningful harvest.
Here are realistic yield expectations per plant per season:
- Dwarf citrus (lemon, lime): 30 to 60 fruits per tree.
- Fig (in a 20-gallon pot): 10 to 20 pounds of fruit.
- Dwarf apple (on M9 rootstock): 20 to 40 apples.
- Blueberry bush: 5 to 10 pounds.
- Strawberries (per 12-inch pot): 1 to 2 pounds.
In terms of yield per square foot, a well-managed intensive bed can produce about 1 to 2 pounds of fruit per square foot per year. Containers will produce less, closer to 0.5 to 1 pound per square foot. That is not a lot. A 200-square-foot orchard might yield 100 to 200 pounds of fruit annually. For most people, this is a hobby, not a food source.
Costs add up quickly. A good quality 20-gallon pot costs $20 to $40. The soil to fill it costs another $20 to $30. A grafted dwarf tree costs $30 to $60. That is over a hundred dollars per tree before you add irrigation and tools. The payoff is not financial; it is the experience of picking a ripe peach ten stories above the street.
Seasonal Maintenance Calendar for Rooftop Orchards
A rooftop orchard is not set-and-forget. It needs attention every month. Here is a calendar based on a temperate climate with four seasons.
Spring (March – May): This is the busy season. Prune fruit trees before new growth starts. Apply a slow-release fertilizer. Repot any trees that have outgrown their containers. Start your irrigation timer once the risk of frost has passed.
Summer (June – August): Water deeply and regularly. Check the water gauge on self-watering containers weekly. Mulch the soil surface to reduce evaporation. Watch for pests like aphids and spider mites, which thrive in hot, dry conditions. Thin fruit on trees to improve the size of the remaining fruit.
Fall (September – November): Harvest late-season fruit. Clean up fallen leaves and fruit to prevent disease. Reduce watering as temperatures drop. This is a good time to take pruning steps for space constraints and shape the trees before winter dormancy.
Winter (December – February): Protect trees from frost. Move potted trees against a south-facing wall for warmth. Wrap pots in burlap or bubble wrap to insulate the roots. Drain and store hoses. Check the roof drains for ice or debris. This is the time to plan next year’s layout and order new trees.
One extra note for winter: saturated soil that freezes can crack pots. If you have a hard freeze warning, consider moving smaller pots into a sheltered area or covering the soil surface to reduce moisture absorption.
FAQ: Permits, Renters, and Shared Roofs
Do I need a permit to build a rooftop orchard?
Often, yes. Any structure that adds significant weight to a roof may require a building permit. This depends on your local codes and the size of the installation. A few small pots usually do not trigger a permit. A large intensive green roof definitely will. Contact your local building department and ask about the threshold for rooftop loads. They will tell you if you need a permit and a structural engineer’s sign-off.
I rent my apartment. Can I put a few fruit trees on the roof?
Only with written permission from your landlord. A rooftop garden can cause damage to the building if not installed correctly, so landlords are often cautious. Offer to sign a document that holds you responsible for any damage and that you will remove the garden when you move out. A modular system with self-contained beds is easier to approve than a permanent installation because it leaves no trace.
How do I share a rooftop garden with other residents?
Set clear boundaries. Assign specific areas or containers to each gardener. Agree on a shared irrigation schedule. Create a rule that everyone cleans up after themselves and does not block the roof drain. A simple written agreement prevents most conflicts. If you are the organizer, consider using a shared tool bin and a communal compost bin.
What is the cheapest way to start a rooftop orchard?
Start with two or three trees in 10 to 15-gallon pots. Buy the pots used, make your own soil mix, and look for bare-root trees in winter when they are cheaper. Skip the expensive irrigation system initially and water by hand. You will learn the microclimate of your roof before investing in a bigger setup.
Can I grow fruit trees on a roof with no parapet or railing?
You can, but you should not. Working on an unprotected roof edge is dangerous. Most building codes require a parapet or railing at least 42 inches high for any occupied roof space. If your roof has no barrier, do not set up a garden near the edge. You also risk losing pots over the side in a strong wind, which is a serious hazard for people below.
What to Do With This Information
You now have the numbers and the framework to plan a serious rooftop orchard. The next step is simple.
- Calculate your roof’s weight limit using the saturated soil formula before you buy anything.
- Get a written structural assessment if you plan to exceed 50 psf in any area.
- Protect the waterproofing membrane with a proper drainage layer and pot feet.
- Choose a system based on your roof load, not your aesthetic preference.
- Match container depth to the tree type. Dwarf rootstock is non-negotiable for most rooftops.
- Install drip irrigation with a timer before the summer heat arrives.
- Start small. Two healthy trees are better than ten struggling ones.
The engineering is not glamorous, but it is the difference between a thriving orchard and a costly mistake. If you want more design inspiration, check out this guide on orchard-inspired rooftop garden design. Now go measure your roof.