
You spent spring building raised beds, hauling soil up four flights of stairs, and nurturing seedlings. Then one gusty afternoon in June, a sustained 25 mph wind snaps your tomato stems at the base and strips half the leaves off your peppers. Rooftop gardeners learn this lesson the hard way: wind is not a minor nuisance. It is the single biggest environmental factor separating a productive rooftop garden from a sad collection of broken plants.
Wind damages plants three ways. Mechanical stress snaps stems and tears leaves. Evaporative stress pulls moisture out of leaves faster than roots can replace it, causing leaf scorch even when soil is wet. And pollination suffers because bees and other beneficial insects avoid exposed, windy areas. This article covers the practical methods for rooftop vegetable garden wind protection, what actually works at different exposure levels, and where most gardeners waste money.

PotatoLife
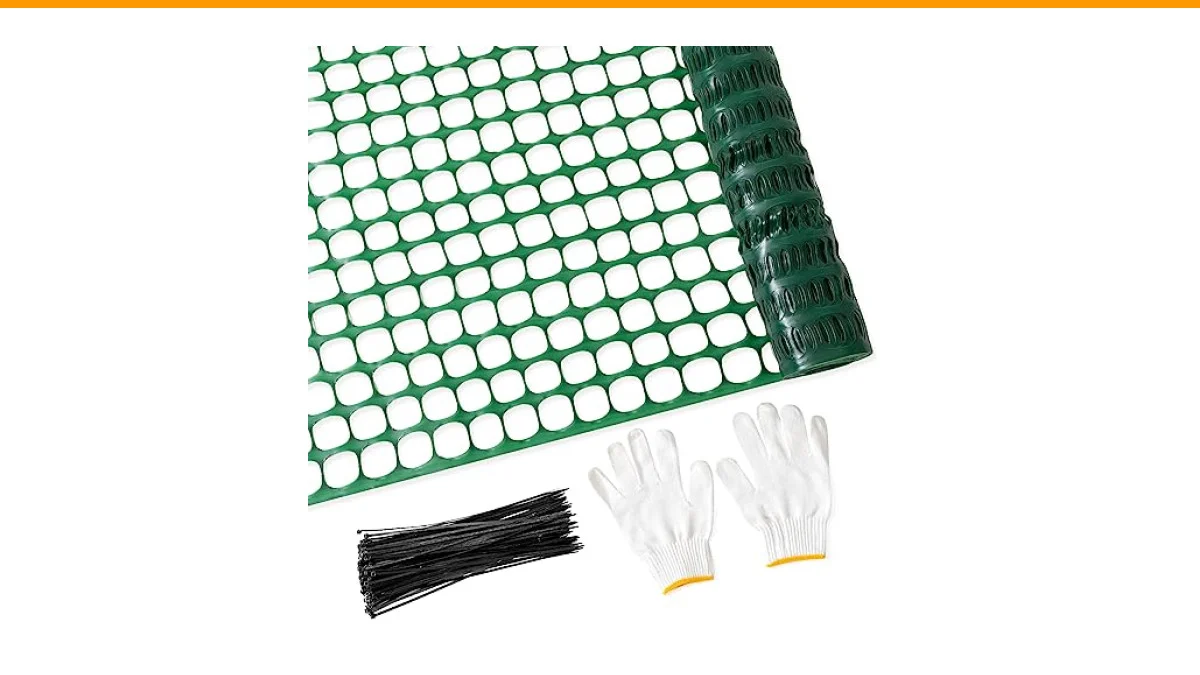
PotatoLife 4'x100' Plastic Mesh Fence for Garden with 100 Zip Ties, Green
- Versatile Use: PotatoLife plastic mesh fence gives you flexibility in how you can use it, from garden fencing, gentle animal barri…
- Durable and Reusable: The fence is made of UV-resistant plastic materials that can withstand harsh outdoor weather. Plus, it's reu…
- Easy Installation & Disassembly: PotatoLife Fence is designed with ease of use in mind. It can be nailed to a post, fastened to a…
You will walk away knowing how to assess your specific wind load, which barriers work and which create turbulence problems, and how to install protection that survives the same storms it is meant to block. One versatile product worth considering from the start: a PotatoLife plastic mesh fence roll. It is not a permanent windbreak, but it handles several jobs at once, which we will get to shortly.
Myth One: Solid Fences Are the Best Windbreaks
Most people assume a solid wall or solid panel provides the best protection. The opposite is true. Solid barriers create a high-pressure zone on the windward side and a violent vacuum on the leeward side. Air accelerates over the top and curls downward, hitting plants from above and behind. That downwash often causes more damage than the original wind.
Windbreak research from agricultural extension services consistently shows that porous barriers, those that block 40 to 60 percent of wind, outperform solid ones. A porous fence slows wind over a distance of 10 to 15 times its height. A solid fence only protects a distance of 2 to 3 times its height, and it creates destructive eddies right behind it.
Think of it like a net versus a wall. A net slows the wind down. A wall deflects it, and deflected wind has to go somewhere, usually straight down into your kale.
Myth Two: Wind Protection Is Only for Winter or Storms
Many rooftop gardeners only scramble for wind protection when a storm warning hits. That misses the bigger problem. Chronic moderate wind, say 10 to 18 mph on a regular afternoon, causes more cumulative yield loss than a single severe storm. Plants under constant wind stress close their stomata to reduce water loss, which also reduces carbon dioxide uptake. Photosynthesis slows. Growth stalls. Fruit set drops.
A study on tomato production in exposed field conditions found that wind speeds above 10 mph can reduce yields by 20 to 30 percent even without visible physical damage. The plants look fine. They just produce less. So wind protection is not storm insurance. It is a year-round growing strategy.
Assess Your Exposure Before You Build Anything
Before spending money on materials, measure your actual wind conditions. Buy a simple handheld anemometer (about $20 to $30) or use a weather app with local station data. Track wind speeds at different times of day for two weeks. Pay attention to afternoon peaks, which are almost always the worst.
Rooftop wind is not uniform. Buildings, parapets, and HVAC units create channels that accelerate airflow. A spot that seems sheltered might actually be a wind tunnel between two structures. Walk your roof during a breezy day and note where leaves and debris collect. Those are your high-wind zones.
Also consider your building height. Wind speed increases roughly 15 to 20 percent for every 30 feet of building height above ground level. A tenth-floor rooftop experiences significantly stronger winds than a third-floor one, even in the same neighborhood.
Practical Wind Protection Methods That Work
1. Porous Fencing and Mesh Barriers
This is your first line of defense. The PotatoLife 4×100 plastic mesh fence fits here well. It blocks roughly 40 to 50 percent of wind depending on how you mount it, which puts it in the effective range for windbreak performance. The roll covers 100 linear feet, so you can wrap a 10×10 foot growing area or create multiple smaller barriers. It comes with 100 zip ties and a pair of gloves, which saves you a separate trip to the hardware store.
Installation is straightforward. Attach the mesh to metal or wooden posts driven into stable containers or anchored to the roof surface. Space posts every 6 to 8 feet. The mesh is UV-resistant, so it will last several seasons outdoors, but it is not a permanent structure. Plan to replace it every 2 to 3 years depending on sun exposure.
One honest caveat: the mesh is light. In a severe storm with gusts over 50 mph, it can flap and pull away from posts if not secured tightly. Use zip ties at every contact point, not just every few feet. And check tension after each major wind event.
2. Living Windbreaks
Tall, dense plants can serve as windbreaks for shorter crops. Sunflowers, Jerusalem artichokes, and tall ornamental grasses like miscanthus create effective porous barriers. They also add visual interest and attract pollinators.
The downside is time. A living windbreak takes a full growing season to establish. You need a plan for year one, usually a temporary mesh fence, while your living barrier matures. Plant windbreak species on the prevailing wind side, typically the west or northwest in most of North America, and space them closer than you would for normal crop growth.
3. Structural Windbreaks Using Existing Features
Parapet walls, roof access structures, and HVAC units all block wind, but they also create turbulence zones. Place your most fragile plants on the leeward side of these features but not directly against them. A distance of 3 to 5 feet from a solid wall gives you the protected zone rather than the turbulent zone.
You can also build simple A-frame structures using lattice panels. Lattice blocks about 30 to 40 percent of wind, which is slightly less effective than mesh but more rigid. Angle the lattice at 45 degrees toward the prevailing wind to deflect airflow upward rather than straight through.
4. Individual Plant Protection
For tall, brittle plants like tomatoes and peppers, structural windbreaks alone are not enough. Use sturdy cages or stake systems that can handle wind load. A single stake driven 12 inches into a container is not adequate for a fully grown tomato plant in wind. Use a Florida weave system or a heavy-duty cage anchored to the container with clips.
Row covers and shade cloth also provide some wind protection while serving other purposes. A 30 percent shade cloth stretched over hoops reduces wind speed at plant level by 20 to 30 percent and cuts water loss. This is a dual-purpose solution for hot, windy rooftops.
Comparing Wind Protection Options
| Method | Wind Reduction | Protected Zone | Cost Range | Lifespan | Best For |
|---|---|---|---|---|---|
| Porous mesh fence (40-60% porosity) | 40-60% | 10-15x its height | $30-$80 per 50 ft | 2-4 years | Most rooftop gardens; flexible layout |
| Solid wood or metal fence | 70-90% | 2-3x its height, turbulence behind | $150-$400 | 5-10 years | Only if you place plants 5+ feet away |
| Lattice panels | 30-40% | 5-8x its height | $40-$90 per panel | 3-6 years | Permanent perimeter screening |
| Living windbreak (sunflowers, grasses) | 30-50% | 8-12x its height | $10-$30 seeds | 1 season | Seasonal protection, pollinator habitat |
| Row covers / shade cloth | 20-30% | Directly under cloth | $15-$40 | 2-3 years | Low crops, heat and wind combined |
| Individual cages and staking | 0% wind reduction | N/A | $5-$20 per plant | 3-5 years | Preventing mechanical damage to tall plants |
The table makes one thing clear: you rarely need just one method. A porous fence around the perimeter plus sturdy staking for tall plants covers most rooftop scenarios. Add row covers for low-growing crops in exposed corners.
Installation Tips That Save You from Rebuilding
Anchoring is where most rooftop wind protection fails. A mesh fence that is not anchored properly becomes a sail. Use these rules:
- Posts must be anchored to something heavy. A 5-gallon container filled with soil weighs about 40 pounds. That is barely enough for a 4-foot fence in moderate wind. Use 15-gallon containers or bolt posts to the roof surface.
- For rental situations where you cannot bolt anything down, use concrete blocks or paving stones as ballast. Two 40-pound blocks per post usually suffice for a 4-foot fence.
- Set posts on the windward side of the fence so wind presses the fence against the posts rather than pulling it away.
- Leave a 1 to 2 inch gap between the bottom of the fence and the ground. This allows some airflow underneath, reducing pressure differential and preventing the fence from becoming a solid barrier at ground level.
- Check all connections monthly. Zip ties degrade in UV light and become brittle. Replace them annually.
One more consideration: your irrigation system will need adjustment when you add wind protection. Windbreaks reduce evaporation, so soil stays moist longer. You may water 20 to 30 percent less frequently. Conversely, if you install a fence that blocks prevailing wind, areas that were previously wind-dried may stay wet, increasing fungal disease risk. Monitor soil moisture for the first two weeks after installation and adjust accordingly.
Placement Strategy by Crop Type
Not all plants need the same level of protection. Group your crops by wind tolerance and place them strategically.
Low, leafy crops like lettuce, spinach, and arugula tolerate wind reasonably well because they stay close to the ground. They still suffer from evaporative stress, but they rarely break. Place them in the middle zones where some wind filters through, which also helps prevent fungal issues.
Tall, brittle crops like tomatoes, peppers, eggplants, and pole beans need the most protection. Put them closest to the windbreak or in the most sheltered corner. They also benefit from individual staking regardless of the windbreak.
Root crops like carrots, radishes, and beets are relatively wind-tolerant above ground but suffer if their leaves get damaged because that reduces photosynthesis. They can go in moderately exposed spots.
Vining crops like cucumbers and squash have large, soft leaves that tear easily. They need protection but also need pollinators, so do not seal them off completely. A porous barrier that lets insects through works best.
Seasonal Adjustments
Wind patterns shift with seasons. In many regions, spring brings strong, gusty winds that damage young transplants. Summer winds are steadier but often weaker. Fall storms return with high gusts.
Your wind protection should be adjustable. A mesh fence that you can roll down partially in spring and fully in fall gives you flexibility. The PotatoLife mesh can be cut to any length, so you can create multiple smaller sections rather than one permanent wall. This also lets you move protection to different parts of the roof as your planting layout changes.
For winter, if you garden year-round under cold frames or indoor growing setups, wind protection becomes less critical because plants are covered. But if you leave soil bare, wind erosion becomes a problem. A mesh fence keeps topsoil and mulch from blowing away.
Frequently Asked Questions
How tall should my windbreak be for a rooftop garden?
Your windbreak should be at least as tall as your tallest crop, ideally 1.5 times that height. For most rooftop vegetable gardens with tomatoes or pole beans reaching 5 to 6 feet, a 6 to 8 foot windbreak works well. Remember that the protected zone extends 10 to 15 times the barrier height downwind, so a 6-foot fence protects plants up to 60 to 90 feet away. You rarely need that much coverage on a typical rooftop, so a shorter fence placed close to your plants is often more practical.
Can I use shade cloth as a windbreak?
Yes, but with limitations. Shade cloth blocks wind only if it is dense enough. A 30 percent shade cloth reduces wind speed modestly, around 20 to 30 percent. A 50 to 60 percent shade cloth works better as a windbreak but also blocks more light, which can reduce yields for sun-loving crops. Use shade cloth for dual purposes, shade and wind, but do not expect it to replace a dedicated windbreak fence in exposed conditions.
How do I anchor a windbreak on a rooftop without drilling holes?
Use heavy containers as ballast. Fill 15-gallon or larger pots with soil or gravel and place them at each post location. Attach the fence posts to the containers using metal brackets or heavy-duty zip ties. Alternatively, use concrete paving stones stacked two or three high and clamp the posts to them. For a temporary setup, sandbags work well, but they degrade over time and need replacement.
Will a windbreak block too much sun for my vegetables?
Most vegetables need 6 to 8 hours of direct sun daily. A porous mesh fence blocks some light, usually 10 to 20 percent, which is acceptable for most crops. Solid fences block more light and also cast a shadow that moves throughout the day. Orient your windbreak on the prevailing wind side, which is usually not the same as the prime sun side. In most of the Northern Hemisphere, south-facing exposures get the most sun, while prevailing winds come from the west or northwest. You can usually position a windbreak without sacrificing significant sunlight.
What is the cheapest wind protection option for a small rooftop garden?
For a small garden, the cheapest effective option is a roll of plastic mesh fencing plus a few wooden stakes driven into heavy containers. The PotatoLife roll covers 100 feet and costs less than most solid fencing materials. You can cut it to fit a 10×10 area and use the rest for other projects like trellising or pest barriers. Total cost for a small setup is usually under $60 including stakes.
What to Do Next
You now know the core principles. Here is a checklist to apply them:
- Measure your actual wind speeds for two weeks before buying any materials. A $25 anemometer saves you from guessing wrong.
- Choose porous barriers over solid ones. Aim for 40 to 60 percent porosity for maximum protected zone.
- Install a mesh fence around the perimeter of your growing area, anchored to heavy containers or bolted posts.
- Stake tall plants individually even with a windbreak in place. No single barrier protects a 6-foot tomato from a 40 mph gust.
- Group crops by wind tolerance. Put fragile plants closest to the windbreak, hardy ones farther out.
- Adjust your watering schedule after installing wind protection. Soil will dry slower, and overwatering becomes a real risk.
- Recheck and tighten all connections monthly. UV-degraded zip ties and loose posts are the most common failure points.
Wind protection is not glamorous, but it is the difference between a rooftop garden that survives and one that merely exists. Start with a porous fence, anchor it properly, and your plants will reward you with stronger growth and better harvests all season.